VMware Advanced Deploy vSphere 7.x 3V0-22.21 Dumps in PDF

Free VMware 3V0-22.21 Real Questions (page: 1)

You are tasked to automate the installation and deployment of new host added into your company vSphere cluster using Auto Deploy. Ensure Auto Deploy and Image Builder is set to start automatically every time vCenter Server is restarted. Use the web client and VCSA0la to perform this step.

Confirm that the auto deploy plugin is available in the web interface. You may be required to logout and log back in after enabling the services.

The vCenter server is required to retrieve software from an online depot. You are to use the depot provided below and ensure that Auto Deploy is always running even, with restart of vCenter server.

Name FirstDepot
URL https / / hostupdate.vmware.com/software/VUB/PRODUCTION/main/vmw-depot-index.xmlNote: ignore error that you received on cannot connect to depot. This is expected due to vCSA do nothave internet connection. Create a deploy Rule on VCSA0la based on information below. You do not need to apply to any host at this time.

Name: Rule1
Specify Rule to match Vendor: Dell
Check 'Do Not Include Image Profile"
Check 'Do Not Include Host Profile"
Select host location: Choose cluster PROD-A

  1. See Explanation section for answer.

Answer(s): A

Explanation:

Before you can use vSphere ESXi Image Builder with the vSphere Web Client, you must verify that the service is enabled and running.

Procedure
Log in to your vCenter Server system by using the vSphere Web Client.
On the vSphere Web Client Home page, click Administration.
Under System Configuration click Services.
Select ImageBuilder Service, click the Actions menu, and select Edit Startup Type.
On Windows, the vSphere ESXi Image Builder service is disabled. In the Edit Startup Type window, select Manual or Automatic to enable Auto Deploy. On the vCenter Server Appliance, the vSphere ESXi Image Builder service by default is set to Manual.
If you want the service to start automatically upon OS startup, select Automatic.
If you select the manual startup type, you must start the service manually upon OS startup every time you want to use the service.
(Optional) Click the Start the service icon.
(Optional) If you want to use vSphere ESXi Image Builder with thevSphere Web Client, log out of the vSphere Web Client and log in again.
The Auto Deploy icon is visible on the Home page of the vSphere Web Client.


Your security team is getting ready for an audit and wants to check the status of all ESXI hosts' outstanding security patches. Create a new fixed Update Manager baseline for all security ESXi host patches and name it ''Security patches. ''Use the patches available in the patch repository.
Use VCSA01a in this task.
Baseline Name: Security Patches
Baseline Type: Host Patch
Category: Security

  1. See Explanation section for answer.

Answer(s): A

Explanation:

The Update Manager displays system managed baselines that are generated by vSAN. These baselines appear by default when you use vSAN clusters with ESXi hosts of version 6.0 Update 2 and later in your vSphere inventory. If your vSphere environment does not contain any vSAN clusters, no system managed baselines are created.
The system managed baselines automatically update their content periodically, which requires Update Manager to have constant access to the Internet. The vSAN system baselines are typically refreshed every 24 hours. You use system managed baselines to upgrade your vSAN clusters to recommended critical patches, drivers, updates or the latest supported ESXi host version for vSAN.
System managed baselines cannot be edited or deleted. You do not attach system managed baselines to inventory objects in your vSphere environment. You can create a baseline group of multiple system managed baselines, but you cannot add any other type of basline to that group.
Similarly, you cannot add a system managed baseline to a baseline group that contains upgrade, patch, and extension baselines.


As a member of the virtual infrastructure team, you have been tasked with creating a new guest customization specification and deploying a test virtual machine from an existing legacy template migrated from an old VMware VI3 environment to complete this task:

Deploy a new virtual machine with the name VM-GuestCust to esxi02a.vclass.local in cluster PROD-A using the following details: vCenter Server: vcsa01a.vdass.local Datastore: ProdDS01 Template; Core-Template The virtual machine requires an additional network card with the type VMXNET3.

Create a new Guest Customization Spec with the name Custom-Spec using the following details:
© Cust-Spec
Operating System: Windows Server 2008 R2
Registration Spec;
Name: vclass Organization: VMware
The computer name must use the virtual machine name. Timezone must be set to America/Central Time Network Specifications:
IPv4 and IPv6 are set to DHCP but require a static DNS entry of 172.20.10.10 The computer must join the domain vclass.local using the following credentials:
Username: administrator
Password: VMware1!

  1. See Explanation section for answer.

Answer(s): A

Explanation:

Select Menu > Policies and Profiles, and under Policies and Profiles, click VM Customization Specifications. Click the Create a new specification icon.
The New VM Guest Customization Specification wizard opens.
On the Name and target OS page, enter a name and description for the customization specification and select Windows as a target guest OS. (Optional) Select the Generate a new security identity (SID) option and click Next.

A Windows Security ID (SID) is used in some Windows operating systems to uniquely identify systems and users. If you do not select this option, the new virtual machine has the same SID as the virtual machine or template from which it was cloned or deployed.

Duplicate SIDs do not cause problems when the computers are part of a domain and only domain user accounts are used. However, if the computers are part of a Workgroup or local user accounts are used, duplicate SIDs can compromise file access controls. For more information, see the documentation for your Microsoft Windows operating system.
On the Set Registration Information page, enter the virtual machine owner’s name and organization and click Next.
On the Computer name page, enter a computer name for the guest operating system and a domain name.
The operating system uses the computer name to identify itself on the network. On Linux systems, it is called the host name.


On the Windows license page, provide licensing information for the Windows operating system and click Next.


On the Set Administrator Password page, configure the administrator password for the virtual machine and click Next. Enter a password for the administrator account and confirm the password by typing it again.
(Optional) Select the Automatically logon as Administrator check box to log users in to the guest operating system as Administrator, and select the number of times to log in automatically. On the Time zone page, select the time zone for the virtual machine and click Next.
(Optional) On the Run Once page, specify commands to run the first time a user logs in to the guest operating system and click Next. See the Microsoft Sysprep documentation for information about RunOnce commands.
On the Network page, select the type of network settings to apply to the guest operating system and click Next.
Select Use standard network settings so that vCenter Server configures all network interfaces from a DHCP server by using the default settings. Select Manually select custom settings and configure each network interface yourself.
Select a network adapter from the list or add a new one.
For the selected NIC, click the vertical ellipsis icon and select Edit. The Edit Network dialog box opens.
Click the IPv4 tab to configure the virtual machine to use IPv4 network.
You can configure all the settings at that stage or you can select the Prompt the user for an IPv4 address when the specification is used option. In that case, vCenter Server prompts for an IP address when you select to apply that customization specification during cloning or deployment. With that option, you can also configure the gateways during cloning or deployment.
Click the IPv6 tab to configure the virtual machine to use IPv6 network.
You can configure all the settings at that stage or you can select the Prompt the user for an address when the specification is used option. In that case, vCenter Server prompts for an IP address when you select to apply that customization specification during cloning or deployment. With that option, you can also configure the gateways during cloning or deployment.
Click the DNS tab to specify DNS server details.
Click WINS to specify primary and secondary WINS server information. Click OK to close the Edit Network dialog box.
On the Set Workgroup or Domain page, select how the virtual machine participates in the network and click Next.

On the Ready to complete page, review the details and click Finish to save your changes.


The company's IT strategy is to adopt innovative and emerging technologies such as softwaredefined storage solution. The IT team has decided to run their business-critical workloads on an allflash Virtual SAN (vSAN) as it provides excellent performance.
The IT team has purchased servers that are compatible with vSAN. However, all the solid-state drives (SSD) in the servers are shown incorrectly as hard-disk drives (HDD) instead.
In addition, some of the solid-state drives (SSD) will be used for other purposes instead of vSAN and should not be part of the vSAN cluster. These are the requirements for the vSAN cluster:
-In each server, use the 3GB SSD as the cache tier and the 11GB SSD as the capacity tier
-As a result the vSAN cluster will use a total of six SSDs (three SSDs for caching and three SSDs for capacity
-Ensure all the disks that will be used for vSAN are shown correctly as SSDs
-Provide storage savings by using deduplication and compression.

Next, the IT team wants to improve the performance and availability of the business-critical workloads on the vSAN-datastore. Ensure the following configurations will be applied on existing and new workloads located on vSANdatastore:
Number of disk stripes per object: 2
Primary level of failures to tolerate: 2
Failure tolerance method: RAID-1 (Mirroring)
Force provisioning; Yes
The new configurations should be applied by default.
You may create new storage policy but do not edit the default vSAN storage policy as it may be used by other vSAN clusters in the future. Name the policy "New vSAN Default'. Nate-. All tasks should be executed in PROD-A host cluster.

  1. See Explanation section for answer.

Answer(s): A

Explanation:

VMware vSphere ESXi can use locally attached SSDs (Solid State Disk) and flash devices in multiple ways. Since SSDs offer much higher throughput and much lower latency than traditional magnetic hard disks the benefits are clear. While offering lower throughput and higher latency, flash devices such as USB or SATADOM can also be appropriate for some use cases. The potential drawback to using SSDs and flash device storage is that the endurance can be significantly less than traditional magnetic disks and it can vary based on the workload type as well as factors such as the drive capacity, underlying flash technology, etc.
This KB outlines the minimum SSD and flash device recommendations based on different technologies and use case scenarios.

SSD and Flash Device Use Cases
A non-exhaustive survey of various usage models in vSphere environment are listed below.

Host swap cache
This usage model has been supported since vSphere 5.1 for SATA and SCSI connected SSDs.
USB and low end SATA or SCSI flash devices are not supported. The workload is heavily influenced by the degree of host memory over commitment.

Regular datastore
A (local) SSD is used instead of a hard disk drive.
This usage model has been supported since vSphere 7.0 for SATA and SCSI connected SSDs.
There is currently no support for USB connected SSDs or for low end flash devices regardless of connection type. vSphere Flash Read Cache (aka Virtual Flash) This usage model has been supported since vSphere 5.5 for SATA and SCSI connected SSDs.

There is no support for USB connected SSDs or for low end flash devices. vSAN This usage model has been supported since vSphere 5.5 for SATA and SCSI SSDs. For more information, see the vSAN Hardware Quick Reference Guide. vSphere ESXi Boot Disk A USB flash drive or SATADOM or local SSD can be chosen as the install image for ESXi, the vSphere hypervisor, which then boots from the flash device.

This usage model has been supported since vSphere 3.5 for USB flash devices and vSphere 4.0 for SCSI/SATA connected devices.

Installation to SATA and SCSI connected SSD, SATADOM and flash devices creates a full install image which includes a logging partition (see below) whereas installation to a USB device creates a boot disk image without a logging partition. vSphere ESXi Coredump device The default size for the coredump partition is 2.5 GiB which is about 2.7 GB and the installer creates a coredump partition on the boot device device for vSphere 5.5 and above. After installation the partition can be resized if necessary using partedUtil. For more information, see the vSphere documentation.

Any SATADOM or SATA/SCSI SSD may be configured with a coredump partition.
This usage model has been supported from vSphere 3.5 for boot USB flash devices and since vSphere 4.0 for any SATA or SCSI connected SSD that is local.

This usage model also applies to Autodeploy hosts which have no boot disk. vSphere ESXi Logging device A SATADOM or local SATA/SCSI SSD is chosen as the location for the vSphere logging partition (/scratch partition). This partition may be but need not be on the boot disk and this applies to Autodeploy hosts which lack a boot disk.

This usage model has been supported since vSphere 7.0 for any SATA or SCSI connected SSD that is local. SATADOMs that meet the requirement set forth in Table 1 are also supported. This usage model can be supported in a future release of vSphere for USB flash devices that meet the requirement set forth in Table 1.

SSD Endurance Criteria
The flash industry often uses Tera Bytes Written (TBW) as a benchmark for SSD endurance. TBW is the number of terabytes that can be written to the device over its useful life. Most devices have distinct TBW ratings for sequential and random IO workloads, with the latter being much lower due to Write Amplification Factor (WAF) (defined below). Other measures of endurance commonly used are DWPD (Drive Writes Per Day) and P/E (Program/Erase) cycles.

Conversion formulas are provided here:
Converting DWPD (Drive Writes Per Day) to TBW (Terabytes Written):
TBW = DWPD * Warranty (in Years) * 365 * Capacity (in GB) / 1,000 (GB per TB) Converting Flash P/E Cycles per Cell to TBW (Terabytes Written):
TBW = Capacity (in GB) * (P/E Cycles per Cell) / (1,000 (GB per TB) * WAF) WAF is a measure of the induced writes caused by inherent properties of flash technology. Due to the difference between the storage block size (512 bytes), the flash cell size (typically 4KiB or 8KiB bytes) and the minimum flash erase size of many cells one write can force a number of induced writes due to copies, garbage collection, etc. For sequential workloads typical WAFs fall in the range of single digits while for random workloads WAFs can approach or even exceed 100. Table 1 contains workload characterization for the various workloads excepting the Datastore and vSphere Flash Read Cache workloads which depend on the characteristics of the Virtual Machines workloads being run and thus cannot be characterized here. A WAF from the table can be used with the above P/E to TBW formula.


Your storage administrator is concerned about a new application being deployed on virtual machine (SIOCVM) in your vSphere 7.x environment.
You've been asked to create and apply a storage policy to make sure that the SIOCVM virtual machine does not exceed 500 IOPS. Note: Name the Storage Policy 500IOPSLimit

  1. See Explanation section for answer.

Answer(s): A

Explanation:

Storage I/O Control v2
Storage I/O Control (SIOC) was initially introduced in vSphere 4.1 to provide I/O prioritization of virtual machines running on a cluster of ESXi hosts that had access to shared storage. It extended the familiar constructs of shares and limits, which existed for CPU and memory, to address storage utilization through a dynamic allocation of I/O queue slots across a cluster of ESXi servers. The purpose of SIOC is to address the ‘noisy neighbor’ problem, i.e. a low priority virtual machine impacting other higher priority virtual machines due to the nature of the application and its I/O running in that low priority VM. vSphere 5.0 extended SIOC to provide cluster-wide I/O shares and limits for NFS datastores. This means that no single virtual machine should be able to create a bottleneck in any environment regardless of the type of shared storage used. SIOC automatically throttles a virtual machine which is consuming a disparate amount of I/O bandwidth when the configured latency threshold has been exceeded. To allow other virtual machines receive their fair share of I/O bandwidth on the same datastore, a share based fairness mechanism has been created which now is supported on both NFS and VMFS. vSphere 5.1 introduced a new SIOC feature called Stats Only Mode. When enabled, it doesn’t enforce throttling but gathers statistics to assist Storage DRS. Storage DRS now has statistics in advance for new datastores being added to the datastore cluster & can get up to speed on the datastores profile/capabilities much quicker than before.
Another 5.1 feature was Automatic Threshold Computation. The default latency threshold for SIOC is 30ms. Not all storage devices are created equal so this default was chosen as a sort of “catch-all”.
There are certain devices which will hit their natural contention point much earlier than others, for example All Flash Arrays, in which case the threshold should be lowered by the user. However, manually determining the correct latency can be difficult for users. This gave rise to the need for the latency threshold to get automatically determined at a correct level for each device. Using the I/O injector modeling of SIOC, peak throughput and corresponding latency of a datastore is measured.
The latency threshold value at which Storage I/O Control will kick in is then set to 90% of this peak value (by default). vSphere administrators can change this 90% to another percentage value or they can still input a millisecond value if they so wish.

The default latency threshold for SIOC can be reduced to as low as 5ms.
SIOC V1 Overview
SIOC V1 is disabled by default. It needs to be enabled on a per datastore level, and it is only utilized when a specific level of latency has been reached. By default, the latency threshold for a datastore is set to 30ms, as mentioned earlier. If SIOC is triggered, disk shares (aggregated from all VMDKs using the datastore) are used to assign I/O queue slots on a per host basis to that datastore. In other words, SIOC limits the number of IOs that a host can issue. The more VMs/ VMDKs that run on a particular host, the higher the number of shares, and thus the higher the number of IOs that that particular host can issue. The throttling is done by modifying the device queue depth of the various hosts sharing the datastore. When the period of contention passes, and latency returns to normal values, the device queue depths are allowed to return to default values on each host.

SIOC V2 Introduction
Before describing SIOC V2, it should be highlighted that SIOC V1 and SIOC V2 can co-exist on vSphere 6.5. This makes it much simpler when considering upgrades, or migrations between versions. With that in mind, SIOC V2 is considerably different from a user experience perspective when compared to V1. SIOCv2 is implemented using IO Filter framework Storage IO Control category. SIOC V2 can be managed using SPBM Policies. What this means is that you create a policy which contains your SIOC specifications, and these policies are then attached to virtual machines.

Creating an SIOC policy based
Creating an SIOC policy is done is exactly the same way as building a storage policy for VSAN or Virtual Volumes. Select the VM Storage Policy from the vSphere client home page, and from there select the option to create a new VM Storage Policy. VM Storage Policies in vSphere 6.5 has a new option called “Common Rules”. These are used for configuring data services provided by hosts, such as Storage I/O Control and Encryption.

Use common rules in the VM storage policy
The first step is to click on the check box to enabled common rules. This will then allow you to add components, such as SIOC, to the policy.
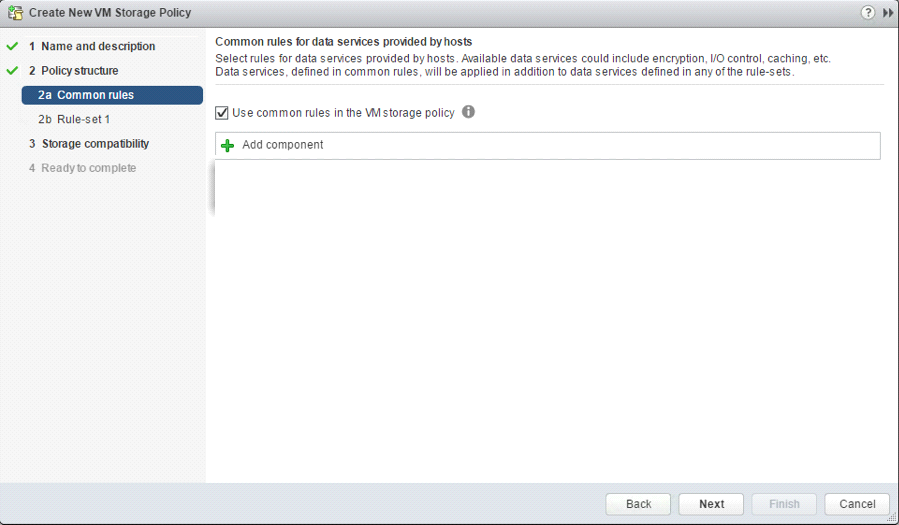

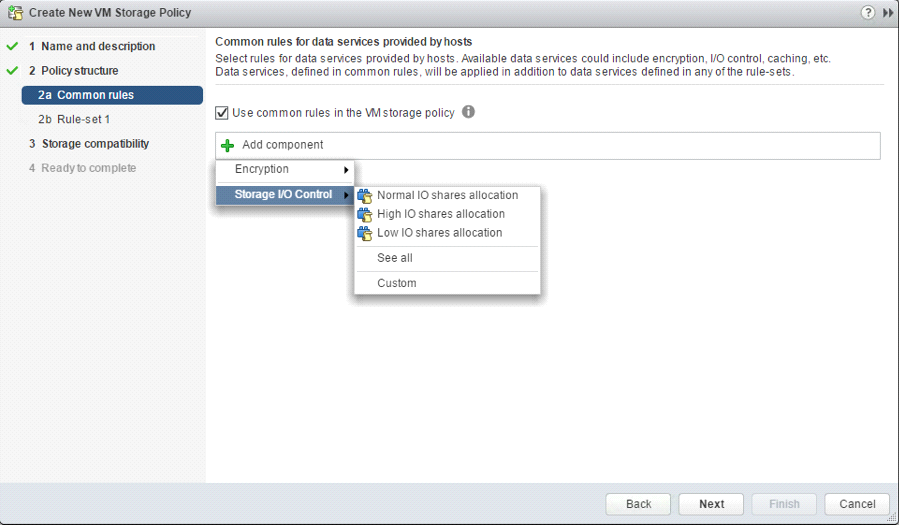
Add Component – Storage I/O Control
In vSphere 6.5, there are two components available for common rules, Encryption and Storage I/O Control. Select Storage I/O Control in this case. Now you can select Normal, High, Low or Custom shares allocation.

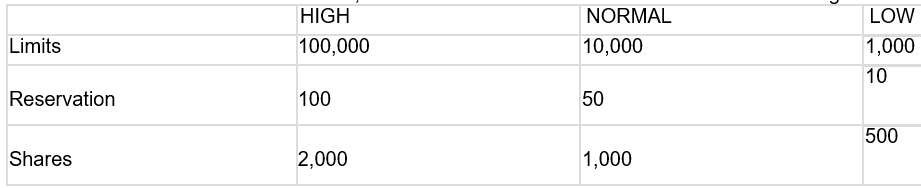
This table describes the different Limits,Shares and Reservations associated with each setting:

When the policy has been created, it may be assigned to newly deployed VMs during provisioning,or to already existing VMs by assigning this new policy to the whole VM (or just an individual VMDK) by editing its settings. One thing to note is that IO Filter based IOPS does not look at the size of the IO.
For example, there is no normalization so that a 64K IOP is not equal to 2 x 32K IOPS. It is a fixed value of IOPS irrespective of the size of the IO. Custom Allocation
If neither of the values in the Normal, High, Low allocations is appropriate, there is the ability to create custom settings for these values. In a custom setting, IOPS limit and IOPS reservation are both set to -1, implying unlimited. These may be modified as required.
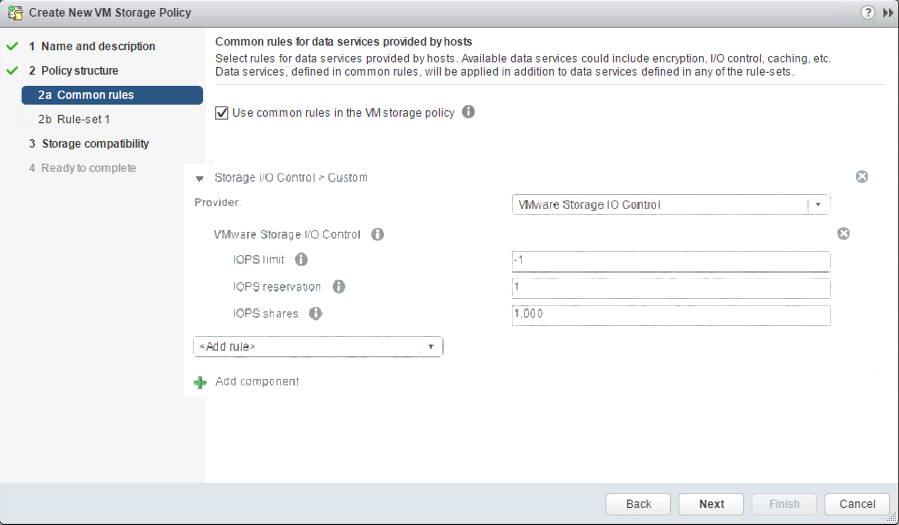

Advanced Options
SchedCostUnit
This is an advanced parameter that was created for SIOC V1 only. SIOC V2 does not have SchedCostUnit implemented. For V1, SchedCostUnit determines the unit size (normalized size) of an IO operation for scheduling, and it is currently a constant value of 32K. This constant value, however, may not satisfy different requirements from different customers. Some customers may want to set this unit size to 4K. Other customers may want to set it up to 256K.

To satisfy these different requirements, SchedCostUnit is now configurable. It defaults to an IO size value of 32K, and allowable values range between 4K to 256K.
The SchedCostUnit dictates how requests are counted. A request with size <= SchedCostUnit counts as a single I/O. Anything greater than SchedCostUnit will be counted as 2 or more requests. For example, by changing the SchedCostUnit from 32K to 64K, the number of IOPS observed will halve. The size of the IO can be set using the:
“esxcli system settings advanced set -o /Disk/SchedCostUnit -i 65536” and verified by using the” "esxcli system settings advanced list -o /Disk/SchedCostUnit” command. SIOC V2 counts guest IO directly. IOPS will be counted based on IO count, regardless of the IO size.

SchedReservationBurst
When limits are set on VMDKs, requests could have high average latency because the limit was enforced at a high (per request) granularity. This was due to the strict enforcement on a VM getting its share of IOs in interval of 1 second/L, where L is the user specified limit. The issue is more visible in fast storage, such as flash arrays. It was noted that SIOC V2 did not perform well when presented with a “bursty” workload on fast storage.

This SchedReservationBurst setting relaxes that constraint so a VM get its share of IOs at any time during a 1 second window, rather than enforce strict placement of IOs in intervals of 1/L. BURST option is turned-on by default. SIOC V2 Limitations

In this initial release of SIOC V2 in vSphere 6.5, there is no support for vSAN or Virtual Volumes. SIOC v2 is only supported with VMs that run on VMFS and NFS datastores.


Share your comments for VMware 3V0-22.21 exam with other users:

A
AI Tutor Explanation
4/29/2026 5:17:10 AM

Why this is correct

  • Correct answer: C. Extract the hardware ID information of each computer to a CSV file and upload the file from the Microsoft Intune admin center.

  • Why this is correct:
- Windows Autopilot requires devices to be registered by their hardware IDs (hash) before Autopilot can deploy Windows 10 Enterprise. - Collect the hardware IDs from the new Phoenix machines, save them in a CSV, and upload that CSV in the Intune/Windows Autopilot area. This maps each device to an Autopilot deployment profile. - After registration, you can assign Autopilot profiles (Windows 10 Enterprise, etc.). Other options (serial number CSV, generalizing, or Mobility settings) are not the initial Autopilot registration steps.

A
AI Tutor Explanation
4/25/2026 1:53:46 PM

Question 7:

  • Correct answer: B — A risk score is computed based on the number of remediations needed compared to the industry peer average.

Explanation:
  • Risk360 uses a remediation-based score. It benchmarks how many actions are required to fix issues against peers, giving a relative risk posture.
  • Why not the others:
- A: Not just total risk events by location. - C: Time to mitigate isn’t the primary scoring method. - D: Not a four-stage breach scoring approach.
Note: The page text shows a mismatch (it lists D as the answer), but the study guide describes the remediation-based scoring (B) as the correct concept.

A
AI Tutor Explanation
4/25/2026 1:42:20 PM

Question 104:

  • Correct answer: D) Multi-Terabyte (TB) Range

  • Brief explanation:
- clustering keys organize data into micro-partitions to improve pruning when queries filter on those columns. - The performance benefit is most significant for very large tables; for small tables the overhead of maintaining clustering outweighs gains. - Therefore, as a best practice, define clustering keys on tables at the TB scale.

C
Community Helper
4/25/2026 2:03:10 AM

Q23: Fabric Admin is correct. Because Domain admin cannot create domains. Only Fabric Admin can among the given options. Q51: Wrapping @pipeline.parameter.param1 inside {} will return a string. But question requires the expression to return Int, so correct answer should be @pipeline.parameter.param1 (no {})

A
AI Tutor Explanation
4/23/2026 3:07:03 PM

Question 62:

  • Correct answer: D (per the page)

  • Note: The explanation text on the page describes option B (use ZDX score and Analyze Score to trigger the Y Engine analysis), indicating a mismatch between the stated answer and the rationale.

  • Key concept: For fast root-cause analysis, leverage telemetry and auto-correlated insights:
- Use the user’s ZDX score for AWS and run Analyze Score to activate the Y Engine, which correlates metrics across network, client, and application to pinpoint the issue quickly.
  • Why the other options are less effective:
- A: Only checks for outages; doesn’t provide actionable root-cause analysis. - C: Deep Trace helps visibility but is manual and time-consuming. - D: Packet capture is invasive and slow; not the quickest path to root cause.

A
AI Tutor Explanation
4/23/2026 12:26:21 PM

Question 32:

  • Answer: A (2.4GHz)

  • Why: Lower-frequency signals have longer wavelengths and experience less attenuation when passing through walls and obstacles. Higher frequencies (5GHz, 6GHz) are more easily blocked by walls. NFC operates over very short distances and is not meant to penetrate walls. So 2.4 GHz best penetrates physical objects like walls.

A
AI Tutor Explanation
4/21/2026 8:48:36 AM

Question 3:

  • False is the correct answer (Option B).

Why:
  • In Snowflake, a database is a metadata object that exists within a single Snowflake account. Accounts are isolated—there isn’t one database that lives in multiple accounts.
  • You can access data across accounts via data sharing or database replication, but these create separate database objects in the other accounts (e.g., a database in the consumer account created from a share), not a single shared database across accounts.

So a single database cannot exist in more than one Snowflake account.

A
Anonymous User
4/16/2026 10:54:18 AM

Question 1:

  • Correct answer: E — date = sys.argv[1]
  • Why this is correct:
- When a Databricks Job passes parameters to a notebook, those parameters are supplied to the notebook's Python process as command-line arguments. The first argument after the script name is sys.argv[1], so date = sys.argv[1] captures the passed date value directly.
  • How it compares to other options:
- date = spark.conf.get("date") reads from Spark config, not from job parameters. - input() waits for user input at runtime, which isn’t how job parameters are provided. - date = dbutils.notebooks.getParam("date") would work if the notebook were invoked via dbutils.notebook.run with parameters, not

A
Anonymous User
4/15/2026 4:42:07 AM

Question 528:

  • Correct answer: NSG flow logs for NSG1 (Option B)

  • Why:
- Traffic Analytics uses NSG flow logs to analyze traffic patterns. You must have NSG flow logs enabled for the NSGs you want to monitor. - An Azure Log Analytics workspace is also required to store and query the traffic data. - Network Watcher must be available in the subscription for traffic analytics to function.
  • What to configure (brief steps):
- Ensure Network Watcher is enabled in the East US region (for the subscription/region). - Enable NSG flow logs on NSG1. - Ensure a Log Analytics workspace exists and is accessible (read/write) so Traffic Analytics can store and query logs.
  • Why other options aren’t correct:
- “Diagnostic settings for VM1” or “Diagnostic settings for NSG1” alone don’t guarantee flow logs are captured and sent to Log Analytics, which Traffic Analytics relies on. - “Insights for VM1” is not how Traffic Analytics collects traffic data.

A
Anonymous User
4/15/2026 2:43:53 AM

Question 23:
The correct answer is Domain admin (option B), not Fabric admin.

  • Domain admin provides domain-level management: create domains/subdomains and assign workspaces within those domains, which matches the tasks while following least privilege.
  • Fabric admin is global-level access and is more privileges than needed for this scenario (it would grant broader control across the Fabric environment).

A
Anonymous User
4/14/2026 12:31:34 PM

Question 2:
For question 2, the key concept is the Longest Prefix Match. Routers pick the route whose subnet mask is the most specific (largest prefix length) that still matches the destination IP.
From the options:

  • A) 10.10.10.0/28 ? 10.10.10.0–10.10.10.15
  • B) 10.10.13.0/25 ? 10.10.13.0–10.10.13.127
  • C) 10.10.13.144/28 ? 10.10.13.144–10.10.13.159
  • D) 10.10.13.208/29 ? 10.10.13.208–10.10.13.215

The destination Host A’s IP must fall within 10.10.13.208–10.10.13.215 for the /29 to be the best match. Since /29 is the longest prefix among the matching options, Router1 will use 10.10.13.208/29.
Thus, the correct answer is D.

S
srameh
4/14/2026 10:09:29 AM

Question 3:

  • Correct answer: Phase 4, Post Accreditation

  • Explanation:
- In DITSCAP, the four phases are: - Phase 1: Definition (concept and requirements) - Phase 2: Verification (design and testing) - Phase 3: Validation (fielding and evaluation) - Phase 4: Post Accreditation (ongoing operations and lifecycle management) - The description—continuing operation of an accredited IT system and addressing changing threats throughout its life cycle—fits the Post Accreditation phase, which covers operations, maintenance, monitoring, and reauthorization as threats and environment evolve.

O
onibokun10
4/13/2026 7:50:14 PM

Question 129:
Correct answer: CNAME

  • A CNAME record creates an alias for a domain, so newapplication.comptia.org will resolve to whatever IP address www.comptia.org resolves to. This ensures both names point to the same resource without duplicating the IP.
  • Why not the others:
- SOA defines authoritative information for a zone. - MX specifies mail exchange servers. - NS designates name servers for a zone.
  • Notes: The alias name (newapplication.comptia.org) should not have other records if you use a CNAME for it, and CNAMEs aren’t used for the zone apex (root) domain. This scenario uses a subdomain, so a CNAME is appropriate.

A
Anonymous User
4/13/2026 6:29:58 PM

Question 1:

  • Correct answer: C

  • Why this is best:
- Uses OS Login with IAM, so SSH access is granted via Google accounts rather than distributing per-user SSH keys. - Granting the compute.osAdminLogin role to a Google group gives admin access to all team members in a centralized, auditable way. - Access is auditable: Cloud Audit Logs show who accessed which VM, satisfying the security requirement to determine who accessed a given instance.
  • How it works:
- Enable OS Login on the project/instances (enable-oslogin metadata). - Add the team’s

A
Anonymous User
4/13/2026 1:00:51 PM

Question 2:

  • Answer: D. Azure Advisor

  • Why: To view security-related recommendations for resources in the Compute and Apps area (including App Service Web Apps and Functions), you use Azure Advisor. Advisor surfaces personalized best-practice recommendations across resources, including security, and shows which resources are affected and the severity.

  • Why not the others:
- Azure Log Analytics is for ad-hoc querying of telemetry, not for viewing security recommendations. - Azure Event Hubs is for streaming telemetry data, not for security recommendations.
  • Quick tip: In the portal, navigate to Azure Advisor and check the Security recommendations for App Services to see actionable items and affe

D
Don
4/11/2026 5:36:42 AM

Recommend using AI for Solutions rather the Answer(s) submitted here

M
Mogae Malapela
4/8/2026 6:37:56 AM

This is very interesting

A
Anon
4/6/2026 5:22:54 PM

Are these the same questions you have to pay for in ExamTopics?

L
LRK
3/22/2026 2:38:08 PM

For Question 7 - while the answer description indicates the correct answer, the option no. mentioned is incorrect. Nice and Comprehensive. Thankyou

R
Rian
3/19/2026 9:12:10 AM

This is very good and accurate. Explanation is very helpful even thou some are not 100% right but good enough to pass.

G
Gerrard
3/18/2026 6:58:37 AM

The DP-900 exam can be tricky if you aren't familiar with Microsoft’s specific cloud terminology. I used the practice questions from free-braindumps.com and found them incredibly helpful. The site breaks down core data concepts and Azure services in a way that actually mirrors the real test. As a resutl I passed my exam.

V
Vineet Kumar
3/6/2026 5:26:16 AM

interesting

J
Joe
1/20/2026 8:25:24 AM

Passed this exam 2 days ago. These questions are in the exam. You are safe to use them.

N
NJ
12/24/2025 10:39:07 AM

Helpful to test your preparedness before giving exam

A
Ashwini
12/17/2025 8:24:45 AM

Really helped

J
Jagadesh
12/16/2025 9:57:10 AM

Good explanation

S
shobha
11/29/2025 2:19:59 AM

very helpful

P
Pandithurai
11/12/2025 12:16:21 PM

Question 1, Ans is - Developer,Standard,Professional Direct and Premier

E
Einstein
11/8/2025 4:13:37 AM

Passed this exam in first appointment. Great resource and valid exam dump.

D
David
10/31/2025 4:06:16 PM

Today I wrote this exam and passed, i totally relay on this practice exam. The questions were very tough, these questions are valid and I encounter the same.

T
Thor
10/21/2025 5:16:29 AM

Anyone used this dump recently?

V
Vladimir
9/25/2025 9:11:14 AM

173 question is A not D

K
khaos
9/21/2025 7:07:26 AM

nice questions

K
Katiso Lehasa
9/15/2025 11:21:52 PM

Thanks for the practice questions they helped me a lot.

AI Tutor 👋 I’m here to help!